
Tuesday, October 30, 2007
All Hallows Eve
As I will be on the road over Halloween, I thought I would post my ghoulish pictures now. There is a house on my daily walk that really gets into the season.
 from a distance it is hard to tell all the ghoulishness that awaits the passerby
 perhaps a little outdoor barbeque?
 I'll take extra ketchup on mine
 And watch out or you might end up dinner for the spider!
 Trick or treat?
 from a distance it is hard to tell all the ghoulishness that awaits the passerby
 perhaps a little outdoor barbeque?
 I'll take extra ketchup on mine
 And watch out or you might end up dinner for the spider!
 Trick or treat?
Sunday, October 28, 2007
A New Leaf
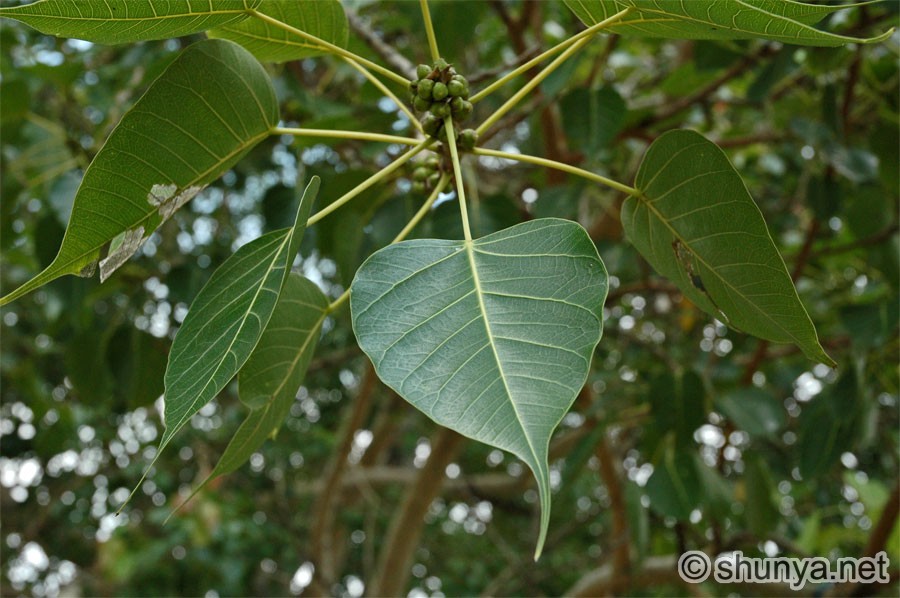
We have had three, nearly four days of long, slow, soaking rain here in the mid-Atlantic. As I was returning home from the subway I saw this tree with golden leaves that looked like the leaves of a BoTree minus the little spike on the tip. [ I had first been introduced to ficus religiosa when I visited the Marie Selby Botanical Gardens near Sarasota Florida.]  I, who have been living in the land of oaks, maples, sassafras and birch, was puzzled by this new leaf. I filed it away, not willing to do a bark inspection in the pouring rain. Then yesterday as I was taking my morning walk, I came upon the same leaf yet again. Only THIS time I knew what the tree was because I know it in the springtime.
 Want to guess the name of the tree this leaf belongs to?
 I, who have been living in the land of oaks, maples, sassafras and birch, was puzzled by this new leaf. I filed it away, not willing to do a bark inspection in the pouring rain. Then yesterday as I was taking my morning walk, I came upon the same leaf yet again. Only THIS time I knew what the tree was because I know it in the springtime.
 Want to guess the name of the tree this leaf belongs to?
Tuesday, October 23, 2007
There's Nothing Like A Deadline
As the day of departure drew near I thought ... "What about those herbs I've been meaning to transplant?" "What about those new evergreens? Shouldn't they be fertilized" "The lawn ... it needs some lime." So with a 1:15 ferry reservation looming (AND a soaking rain) we raced around the yard pounding 18 inch holes in the ground, dispersing lime pellets and sloppily transplanting and finished just as the first raindrops started to fall. There is nothing quite so satisfying as the sound of rain AFTER you have fertilized and transplanted.
Then I harvested the last of the perishables and put them in a basket. Some of these late 'maters have been really tasty.

Then I harvested the last of the perishables and put them in a basket. Some of these late 'maters have been really tasty.

Wednesday, October 17, 2007

Garlic Jelly
 So well you might ask, "WHY would I WANT to make garlic jelly?" If you are asking, then this is probably NOT a project for you. But I find it is a great way to use up the extra cloves you choose NOT to plant because they are #1 doubles or #2 too small. With a little bit of patience you will have them peeled and sliced in no time. Thanks to Jim at Walatoola for pulling up this recipe and for teaching me how to do this last season
Garlic Jelly (from Blue Ribbon Preserves Linda J. Amendt, p. 102)
This exotic jelly is heaven for garlic lovers. Spread a small spoonful on a cracker for a great snack or appetizer.
makes about 7 half-pint jars
Garlic vinegar
3 cups white wine vinegar
¾ cup peeled and very thinly sliced fresh garlic (about 50 cloves)
2 cups garlic vinegar
2 cups white wine
6 cups sugar
2 3 ounce pouches of liquid pectin
To prepare the garlic vinegar: In a medium stainless steel saucepan, combine the wine vinegar and garlic. Over medium heat, bring the garlic mixture to a gentle boil. Reduce the heat, cover and simmer for 15 minutes. Remove the pan from the heat.
Pour the garlic and vinegar into a 1½-quart clean glass jar, or divide evenly between 2 (1-quart) jars, then set aside to cool. When the mixture is cool, cover the jar opening with 2 layers of plastic wrap, then screw on the lid or ring. Let stand at room temperature for 24 hours.
Place a fine-meshed sieve over a pan or bowl. Ladle the garlic pulp and vinegar into the sieve to separate the pulp from the vinegar. Discard the garlic pulp. Rinse the sieve and line it with 4 layers of clean, damp cheesecloth. Stain the vinegar through the cheesecloth 2 times, rinsing the cheesecloth between each straining. Line the sieve with a paper coffee filter and strain the vinegar again. Cover the vinegar and let stand several hours or overnight.
Ladle or pour the vinegar into another container, being careful not to disturb or pick up any sediment from the bottom of the original container. Discard any sediment. Place a fine-meshed sieve over a pan or bowl. Line the sieve with a paper coffee filter and strain the vinegar. For a clearer jelly, strain the vinegar through 2 or 3 layered paper coffee filters. Measure 2 cups of vinegar.
To make the jelly: In an 8-quart pan, combine the garlic vinegar and white wine.
Over medium heat, heat the mixture until warm. Add the sugar and heat, stirring constantly, until the sugar is completely dissolved. Increase the heat to medium-high and bring the mixture to a full rolling boil, stirring constantly. Stir in the entire contents of both pectin pouches. Return the mixture to a full rolling boil, stirring constantly. Boil, stirring constantly, for 1 minute. Remove the pan from the heat.
Quickly skim off any foam and immediately ladle the hot jelly into hot jars, leaving ¼-inch headspace. Wipe the jar rims and threads with a clean, damp cloth. Cover with hot lids and apply screw rings. Process half-pint jars in a 200F (93C) water bath for 10 minutes, pint jars for 15 minutes.
Variation:
Garlic Chive Jelly: Add ½ cup finely chopped fresh chives to the jar before adding the hot garlic and vinegar mixture.

Wednesday, October 10, 2007
The Garlic Is Planted
 With the promise of three days of rain to follow, I worked all day yesterday to get the garlic planted. I decided to devote four rows in each of my two 4x8 raised beds to possible ribbon contenders. For those rows I planted the garlic in a wider grid ... 6x8 inches. Into those rows I planted Montana Giant, Ukranian, Sicilian Artichoke, Pskem and the one I call Place Monge.
Then once the garlic was planted I used the leftover planting cloves to make Garlic Jelly. It requires lots of filtering to make it clear. Here it is in the early stages.

Monday, October 08, 2007


Autumn Olive Jam
 I went down in to the field yesterday afternoon to gather autumn olive berries. The drought has taken a toll on the ones in my front yard. Many bushes are sporting a pale red berry that doesn't look like it would taste very good. While searching I spied a HUGE wasps nest tucked in the branches of a red cedar. I've never seen a nest this big. The diameter at its top was between 15 and 18 inches and it was nearly 2 feet long. But I digress.
The Autumn Olive Elaeagnus Umbellata is really not an olive at all but a bright red berry that ripens the first week in October. It is an
 invasive species here and I figure what better way to combat an invasive species than by eating their seed. It has the ability to fix airborne nitrogen in its roots and so has an unfair advantage when dealing with native plants in low nitrogen habitats. And recent studies have shown that these little berries ounce for ounce pack 17 times as much lycopene as tomatoes.
So I gathered the requisite 8 cups of berries and followed my carefully worked out recipe from last year. The only difference is that 8 cups of berries this year only yielded 4 cups of pulp. But I carried on as if it were 5 cups anyway and it tastes pretty good.


Sunday, October 07, 2007
Building a garden tepee structure
The Polly Hill Arboretum offered a workshop in building garden structures yesterday and I signed up. It was run by Janice Shields who operates in the Berkshires of western Massachusetts. I arrived a little before 9:00 am with my drill and my loppers and my hammer.
Janice shared her story of how this work found her. It is a wonderful marriage of her artistic talent and the reclamation she does on land that is being cleared for housing. She makes that pesky bittersweet in the backyard sing with poetic whimsy on her trellises and furniture.
The 14 of us in the workshop were taught how to construct both a tepee type structure or a straight up piece. I was looking to build something for peas to grow on, so I chose the tepee style.


 We worked in teams and helped each other hold down the wood as we built the basic structure. Then once that was done, the process of decorating began. The wood sort of speaks to the other wood about where it ought to go on the structure. You lay it on the surface and feel where it wants to rest. When I got home I went through c some old driftwood I had in the shed and added a piece to the top of my structure.
 Now that I know how easy this is to do I may build some tomato cages out of old poplar we have been cutting down.
Wednesday, October 03, 2007
Beans
I think the most satisfying crop I grew this year, next to tomatoes of course, was green beens. I used a variety of French beans and succession planted them every 10 days starting in early May. What was interesting is that the tired old plants got a second burst of flowering energy that I wasn't expecting. After they gave their first crop, they would have about a 2 week period of dormancy and then IF they were sufficiently watered, I would start to see flowers again. The beans from this second wind were more likely to be misshapen and would get woody faster. But there were plenty of good beans to get each day. I did NOT have good luck with Vermont Cranberry Beans. The reason is I used old seed. But I did get enough to muster up a bean and kale soup for lunch. Kale soup is an island staple that usually calls for sausage (chorizo). Here is a less fat laden version.
Caldo Verde
1/2 lb. kale 1 onion chopped
4 cups bullion
1/2 tsp. red pepper flakes
1 cup fresh Vermont Cranberry Beans (a can of Progresso Cannelini Beans is a perfect substitute)
1 potato grated
crusty bread and fresh mint (optional)
Shred the kale and combine with the onion, bullion and red pepper flakes. Bring to a boil and cook for 1 hour. Add beans and potatoes. Cook 1/2 hour. Place a piece of bread in the bottom of the soup bowl and cover with a sprig of mint. Ladle the soup over the bread and mint.
 I did NOT have good luck with Vermont Cranberry Beans. The reason is I used old seed. But I did get enough to muster up a bean and kale soup for lunch. Kale soup is an island staple that usually calls for sausage (chorizo). Here is a less fat laden version.
Caldo Verde
1/2 lb. kale 1 onion chopped
4 cups bullion
1/2 tsp. red pepper flakes
1 cup fresh Vermont Cranberry Beans (a can of Progresso Cannelini Beans is a perfect substitute)
1 potato grated
crusty bread and fresh mint (optional)
Shred the kale and combine with the onion, bullion and red pepper flakes. Bring to a boil and cook for 1 hour. Add beans and potatoes. Cook 1/2 hour. Place a piece of bread in the bottom of the soup bowl and cover with a sprig of mint. Ladle the soup over the bread and mint.
Subscribe to:
Posts (Atom)
